
Create an Angular Material style side nave menu.
For those like me who want to see the code first, then the code for this can be found in two locations.
- Github repo found here: Github Angular Material Menu
- Working Plunker found here: Plunker ngMaterial Menu
Backstory
Ever since Angular Material came out I have been watching and waiting for the neat side navigation menu on their site

I was always like "when am I going to be able to have this in my sites"? What I thought was an answer to the above question was only a big disapointment. The version 0.10.x has something listed in their milstone to have, you guessed it, 'Menu':
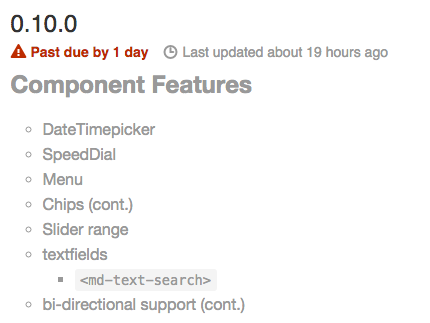
But thier interpretation of a 'Menu' ended up being this:
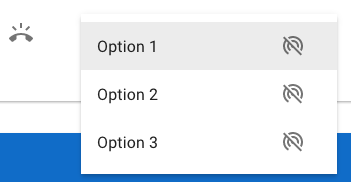
Ok, so what do you do?
You make your own.
So I spent the most time piecing together what they have on their site and making custom directives out of the code. It wasn't all that bad, and instead of you having to go through this again I will explain the teardown and rebuild of their side nav/menu bar.
Overview
A bit of a disclaimer here, as well as, some assumptions. I use ui-router for my client side routing instead of ng-route which comes with angular. If you havent heard of ui-router then I suggest you take a look. Since the writing of this article the Angular 2.0 router has not been backported to Angular 1.4 and currently isn't fully supported. Because I am using ui-router I will be linking to states instead of routes.
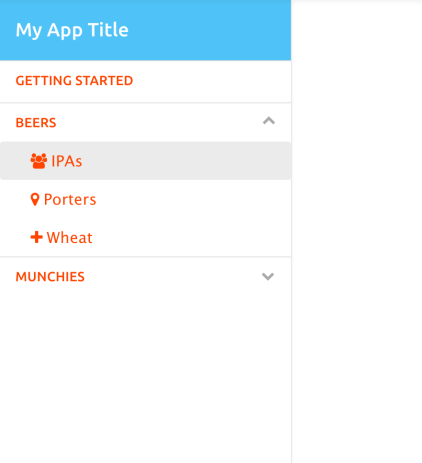
Start with the Structure of Menu Items and Sub-items
You want to start with the structure of your menu. In my example, I have 'Getting Started', 'Beers', and 'Munchies' as my top menu items. Out of these menu items I only want 'Beers' and 'Munchies' to have sub-items, so I added some types of beers and munchies which will become the sub-item list. Once we have a basic idea for a menu with/without sub-items we can put it into an Angular factory/service using a structure that mirrors that structure.
Menu Factory/Service
The factory is a simple service that holds the information for what goes in the menu and a few functions that help dealing with which item you are viewing.
Menu Structure
The object for storing structure of the menu is just an array named sections which allows us to visually see the structure easy and add items to really easy.
      sections.push({
          name: 'Beers',
          type: 'toggle',
          pages: [{
            name: 'IPAs',
            type: 'link',
            state: 'beers.ipas',
            icon: 'fa fa-group'
          }, {
            name: 'Porters',
            state: 'home.toollist',
            type: 'link',
            icon: 'fa fa-map-marker'
          },
          {
            name: 'Wheat',
            state: 'home.createTool',
            type: 'link',
            icon: 'fa fa-plus'
          }]
        });
Properties
If you noticed there were a couple of explanations needed for example the type property is used to indicate which type of menu item this is (link or toggle), and the state is used to indicate where we want to go when the menu item is selected. The icon is which little icon you want displayed to the left of the menu item. If you want to have no item just leave this blank.
Menu Directives
So there are only two directives used here. First, there is a menuToggle that shows and hides menu items that have sub-items assocaited with them. Second, there is a menuLink directive that is used for creating links to the sub-item's ui-router state. For example, the sub-item IPA under Beers will have a menuLink directive provides a clickable link to the IPA beers.ipa state.
Menu Toggle
The Directive
The derective is quite easy to understand, however, there are a couple of 'whats happening here' kind of statements, and I'll go over those here.
var controller = $element.parent().controller();
a. this line of code allows us to get a handle of the parents controller. We need the parent controller because we will be calling functions in the parent controller on behalf of this directive.
        .directive('menuToggle', [ '$timeout', function($timeout){
          return {
          scope: {
            section: '='
          },
          templateUrl: 'partials/menu-toggle.tmpl.html',
          link: function($scope, $element) {
            var controller = $element.parent().controller();
            $scope.isOpen = function() {
              return controller.isOpen($scope.section);
            };
            $scope.toggle = function() {
              controller.toggleOpen($scope.section);
            };
          }
         };
        }])
The Template
I put the template in the Angular's template cache (html is listed below) for simplicity sake, however, it would be bettter to store in another file to make editing the HTML a whole lot easier.
<md-button class="md-button-toggle" ng-click="toggle()"
           aria-controls="side-menu-{{section.name | nospace}}" flex layout="row" aria-expanded="{{isOpen()}}">{{section.name}}
     <span aria-hidden="true" class="pull-right fa fa-chevron-down md-toggle-icon" ng-class="{\'toggled\' : isOpen()}"></span>
</md-button>
<ul ng-show="isOpen()" id="side-menu-{{section.name | nospace}}" class="menu-toggle-list">
    <li ng-repeat="page in section.pages">
        <menu-link section="page"></menu-link>
    </li>
</ul>
There are a couple interesting things here.
<ul ng-show="isOpen()" ...is where the menu knows to open or close. If we look back to the directive snippet we can see thatisOpen()actually calls the parent's controller functionisOpen()
         $scope.isOpen = function() {
             return controller.isOpen($scope.section);
         };
<li ng-repeat="page in section.pages"><menu-link section="page"></menu-link></li>
a. this peice of HTML is used to indicate we want to also include themenuLinkdirective for each menu item's sub categories.
MenuLink Directive
This directive is for when the type is link within your menu structure.
For example:
        {   name: 'IPAs',
            type: 'link',
            state: 'beers.ipas',
            icon: 'fa fa-group'
        }
The Directive
    .directive('menuLink', function () {
      return {
        scope: {
          section: '='
        },
        templateUrl: 'partials/menu-link.tmpl.html',
        link: function ($scope, $element) {
          var controller = $element.parent().controller();

          $scope.focusSection = function () {
            // set flag to be used later when
            // $locationChangeSuccess calls openPage()
            controller.autoFocusContent = true;
          };
        }
      };
    })
This is a pretty simple directive with a linking function only around 10 lines of code. The functionality is within the template, so here it is.
The Template
<md-button ng-class="{\'{{section.icon}}\' : true}" ui-sref-active="active" ui-sref="{{section.state}}" ng-click="focusSection()">
  {{section | humanizeDoc}}
    <span class="md-visually-hidden" ng-if="isSelected()">current page</span></md-button>
Basically, this will create a menu item that is not of type:'toggle' which is just a link. This directive is used for both top level menu items and sub menu items because we don't want all menu items to be toggleable...is that a word?
The Parent Controller
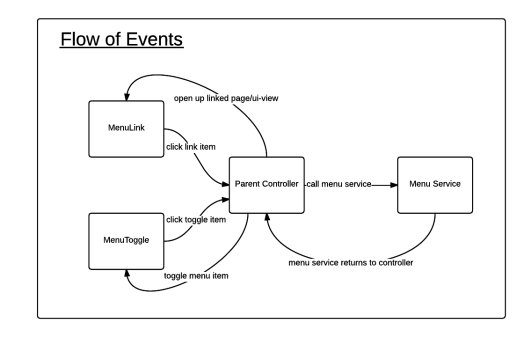
The parent controller and its template contains both the menuToggle and menuLink directives, and it serves as sort of a middle man between the directives and the menu service. Every time something happens in either menuToggle or menuLink directives there is a reaction that is fired in the parent controller. The parent controller then fires off another reaction to the menu service. For example, I select a menu item that is of type: 'toggle'. This click event is captured in menuToggle directive and then, in result, it calls the parent controller's function which, in turn, calls the menu service's function which then sends back the information to display the clicked menu item's sub items.
.controller('HomeCtrl', [
      '$rootScope',
      '$log',
      '$state',
      '$timeout',
      '$location',
      'menu',
      function ($rootScope, $log, $state, $timeout, $location, menu) {

        var vm = this;
        var aboutMeArr = ['Family', 'Location', 'Lifestyle'];
        var budgetArr = ['Housing', 'LivingExpenses', 'Healthcare', 'Travel'];
        var incomeArr = ['SocialSecurity', 'Savings', 'Pension', 'PartTimeJob'];
        var advancedArr = ['Assumptions', 'BudgetGraph', 'AccountBalanceGraph', 'IncomeBalanceGraph'];

        //functions for menu-link and menu-toggle
        vm.isOpen = isOpen;
        vm.toggleOpen = toggleOpen;
        vm.autoFocusContent = false;
        vm.menu = menu;

        vm.status = {
          isFirstOpen: true,
          isFirstDisabled: false
        };
        function isOpen(section) {
          return menu.isSectionSelected(section);
        }
        function toggleOpen(section) {
          menu.toggleSelectSection(section);
        }
      }])
The Template for Parent Controller
The template really only has one important note. The HTML:
<li ng-repeat="section in vm.menu.sections" class="parent-list-item"
              ng-class="{'parentActive' : vm.isSectionSelected(section)}">
            <h2 class="menu-heading" ng-if="section.type === 'heading'"
                id="heading_{{ section.name | nospace }}">
              {{section}}
            </h2>
            <menu-link section="section" ng-if="section.type === 'link'"></menu-link>
            <menu-toggle section="section" ng-if="section.type === 'toggle'"></menu-toggle>
    </li>
This section of html allows the menu structure you created above to be created. These 5 lines loop through your menu sections and identifies which sections/pages are links or toggles.
For Example:
      sections.push({
          name: 'Beers',
          type: 'toggle',
          pages: [{
            name: 'IPAs',
            type: 'link',
            state: 'beers.ipas',
            icon: 'fa fa-group'
          }, {
            name: 'Porters',
            state: 'home.toollist',
            type: 'link',
            icon: 'fa fa-map-marker'
          },
          {
            name: 'Wheat',
            state: 'home.createTool',
            type: 'link',
            icon: 'fa fa-plus'
          }]
        });
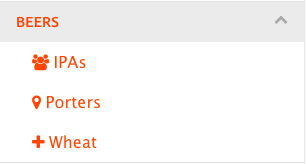
The above snippet will create a Beers toggleable menu item with 3 menu sub items all which are links to their individual states. This example will have this as a result:
The Complete Parent Template
The above snippet is the complete parent template that contains both the menuLink and menuToggle directives.
<div layout="row">
  <div>
    <md-sidenav class="md-sidenav-left md-whiteframe-z1" md-component-id="left" md-is-locked-open="$mdMedia('gt-sm')">
      <md-toolbar md-scroll-shrink>
        <div class="md-toolbar-tools">
          <h3>
            <span>My App Title</span>
          </h3>
        </div>
      </md-toolbar>
      <md-content flex role="navigation">
        <ul class="side-menu">
          <li ng-repeat="section in vm.menu.sections" class="parent-list-item"
              ng-class="{'parentActive' : vm.isSectionSelected(section)}">
            <h2 class="menu-heading" ng-if="section.type === 'heading'"
                id="heading_{{ section.name | nospace }}">
              {{section}}
            </h2>
            <menu-link section="section" ng-if="section.type === 'link'"></menu-link>
            <menu-toggle section="section" ng-if="section.type === 'toggle'"></menu-toggle>
          </li>
        </ul>

      </md-content>
    </md-sidenav>
  </div>
</div>
Diagram
If the above description didn't help here is another explanation of what is happening between the parent controller, the directives, and the service. First, start with either clicking on the menuLink or menuToggle menu items then follow the flow through either then menu item toggling, or the menu link's page/ui-view displaying.
Conclusion
Hope this was helpful. Let me know any upgrades/updates I can make to this to improve it, as I know it needs some massaging. I just wanted to get this out, so anyone who is stuck will find this useful. Also, let me know if you think my blog post needs some more infomation to help you all.