
 The task here is to setup an Amazon EC2 instance and run the Ghost blogging application. Basically, I wanted to create this blog, that your viewing now, on Amazon EC2 and use my GoDaddy domain name. This will be a two part blog where the first part will be setting up EC2 while the second part will be Amazon Route53 setup using GoDaddy as the registrar. I thought this was going to be an easy setup, however, I thought wrong. The were a few gotchas that really held me up, so I hope this document helps anyone having issues setting up Ghost blogger on EC2. This step by step process will be a document for anyone having this issue or plans to do the same configuration as I.
NOTE: I have updated this post to a much streamlined approach. This blog has some great information, however, if you are running Amazon Linux on EC2 my other post might be better for you: Installing Ghost on EC2... Fast
Amazon Setup
Ok, section will go over what is needed to do in Amazon in general. Meaning this will go over setting up your EC2 instance both from within the server and on the Amazon Management Console. In addition, I will go over Amazon's Route 53 configurations as well. Below is an overview of what needs to be done. Now I use Elastic IPs for my EC2 instance. If you dont know how to setup your instance to use Elastic IPs, or you dont know what they are then you should watch this video:
Basically Elastic IP is synonymous with a static IP, as it doesn't change when you restart your instance so you can always refer to the same IP address in applications and not worry about them changing.
EC2 Instance Setup
First things first, you are going to need to start up an EC2 instance. I am still on the free tier for EC2, so I use the micro instance with 8GB of space locally stored. For the purposes of these instructions we will be using the Amazon Linux AMI. If you are not familiar with this setup please refer to Amazon documents. I will not go over creating key pairs and how to SSH into your instance I will just cover what to do when SSH'd into your instance. So let's start from there.
Now when you have the environment you wanted setup lets SSH into the instance using the pem key you created with a key pair. Once you have connected, your first command in the console should be the following to update all of the installed packages on the server.
$ sudo yum update
Export Http Port
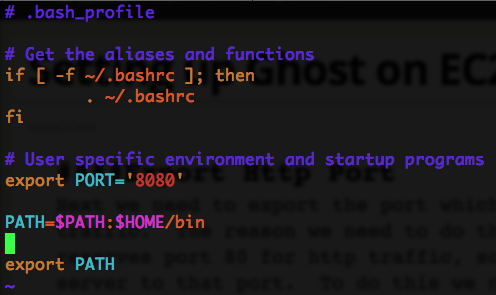
Next we need to export the port which will be used to handle http traffic. The reason we need to do this is because Amazon Linux reserves port 80 for http traffic and the first 1,000 ports are reserved for root access in general therefore we cannot bind our Ghost Node server to that port as a normal user. To do this we will first edit a file within our ec2-user's home directory to set an environment variable for the port that we will be using.
$ cd ~
$ vi .bash_profile
We will visit this same file again later when we install NodeJS. For now we need to make this file look like this:
Now to save and exit using these commands:
    esc
    :wq
    source .bash_profile
Next we need to redirect incoming requests on port 80 (http) to our recently exported port (8080).
Redirect Port 80 to 8080
This is done in one easy linux command listed below:
$ sudo iptables -A PREROUTING -t nat -i eth0 -p tcp --dport 80
-j REDIRECT --to-port 8080
And thats is it. You now have all http traffic feeding right into our node server hosted on port 8080. Next is installing GCC compiler.
Install GNU C Compiler (gcc) and GCC++
You can download prebuilt a pre-built for Linux NodeJS binary or you can retrieve the source code and build it yourself. For this exercise we will build Node from source and this requires a gcc compiler to be installed on your machine because Node will be built to generate the binary files necessary for running it. Dont let this scare you as we will just use a simple yum command to download and install for everything required.
$ sudo yum groupinstall "Development Tools"
Install Node
The first step involved in installing any software is downloading it. I am using the Amazon Linux, AMI so all I have to do is run the following command:
$ wget http://nodejs.org/dist/v0.10.26/node-v0.10.26.tar.gz
NOTE: You can also use git and clone the NodeJS repo and then checkout the necessary branch, but I figured this was a lot easier to explain to someone who is not familiar with git.
After that we have to set permissions, untar the file, and remove the tar'd version of node with these commands:
$ tar xzf http://nodejs.org/dist/v0.10.26/node-v0.10.26.tar.gz
$ rm node-v0.10.26.tar.gz
This gets us to the point where we need to build NodeJS. To do this we cd into the ~/node-v0.10.26-linux-x64 directory and issue these commands:
$ ./configure
$ sudo make
This takes a very long time, sometimes up to 20 minutes, so go do something productive instead of watching water boil on your screen. After Node has finished building, its now time to install it.
$ sudo make install
Installing Node via this method will result in the binary being placed in /usr/local/bin/
You can confirm that the build and install was successful and resulted in the binary being installed where expected with the following.
$ which node
/usr/local/bin/node

$ node --version
v0.10.26
You know have NodeJS installed, however, we are not yet finished with the install. Once done with that lets add node command to our path, so we can use node command instead of the full path to the executable. Within your home directory there is a file named .bash_profile, and within that file we need to add a the following lines to the end:
export NODE_HOME='~/node-v0.10.26-linux-x64'
PATH=$NODE_HOME/bin:$PATH
Here is an example of my .bash_profile:
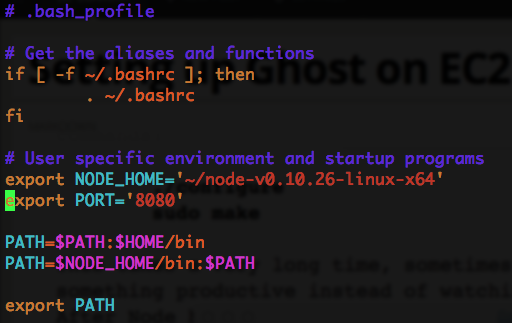
Now save and exit. To 'refresh' this file for the OS to use we must first source it with source .bash_profile. For a sanity check try running node -v and this should return the version of your file. Another good thing to check is to see if you have the Node Package Manager(NPM) which should come with NodeJS within the download. To check its within your path just do the following.
$ which npm
/usr/local/bin/npm
$ npm -v
1.4.3
If that command returns the npm version we are all set to download and install Ghost.
Install Ghost
First we need to acquire the Ghost node application. Using a similar command as before to download:
$ wget https://ghost.org/zip/ghost-0.4.1.zip
Now we need to do a few things done before we can start up Ghost. I am just going to list the few commands that I performed to organize and unzip. Now I performed these commands while in my home directory, but you could install Ghost where ever pleases you.
 $ mkdir ghost
  $ cd ghost
 $ mv ../ghost-*.zip ghost
 $ unzip ghost-*.zip
 $ rm ghost-*.zip
These commands will unzip the necessary Ghost files in the ghost directory. Next we need to let the Node Package Manager(npm) to download and install the necessary libraries that Ghost needs to run. To do this we run:
$ npm install --production
Note the --production as this only downloads the production dependencies and not the development or test ones.
Change Config.js
Now we need to change some config options that come with Ghost out of the box. Copy the config.example.js file found in the Ghost distribution to config.js and then open up ~/ghost/config.js with your favorite editor.
$ cp config.exmple.js config.js
$ vim config.js
Within this file you will find a section tagged production. We are going to have to make changes to this so that this section looks like this:
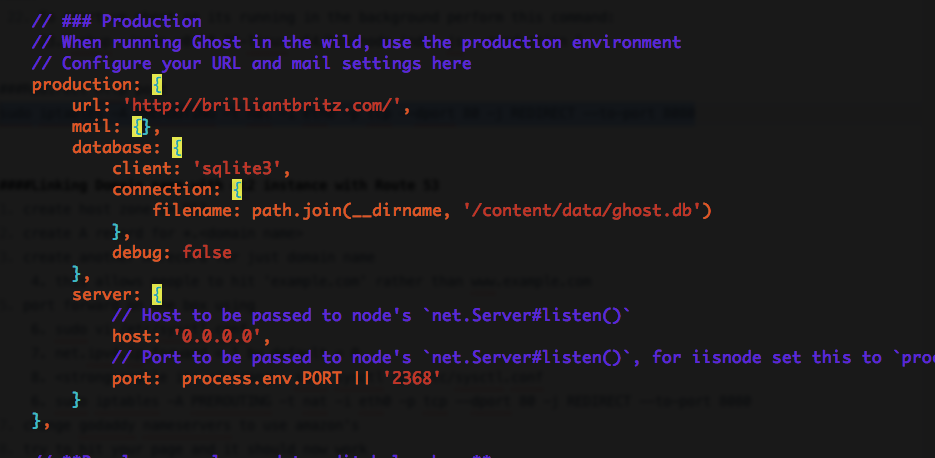
Of cource you would replace http://brilliantbritz.com/ with your url. There are a couple of things to notice here. First the host element. Notice how its binding to 0.0.0.0. This is because we want node to start up and bind to any open IP address. Second, notice the process.env.PORT. This will use our environment variable PORT when starting up. I ended up just changing all environments in this file to the same configurations concerning IP and Port number. Now save and exit:
esc
:wq
Start Er' Up
Now time to start Ghost.
$ node index.js
Now this will be hosted on the Elastic IPs address, however, that is ugly and not very effective for people to get to. To see the Ghost Blogger's home page just navigate your browser to your ElasticIP address. So in the second part of this blog I will show you how to use Amazon's Route53 and GoDaddy to be able to use your domain name instead of IP.
I hope you found this helpful. And leave and comment/questions below, and I will try my best to answer them